Now that we understand how to authenticate a C# application to work with your own project�s GCP resources, let�s take it a step further. In this post, we�ll look at how we can combine that connectivity with end user data, via three-legged OAUTH authorization, to perform operations on user content, with their permission of course.
For this example, I�ve created a very simple ASP.NET MVC project that logs a user in, gets their profile image, and uploads it to a specific bucket. Let�s take a closer look at each part.
Creating API Credentials
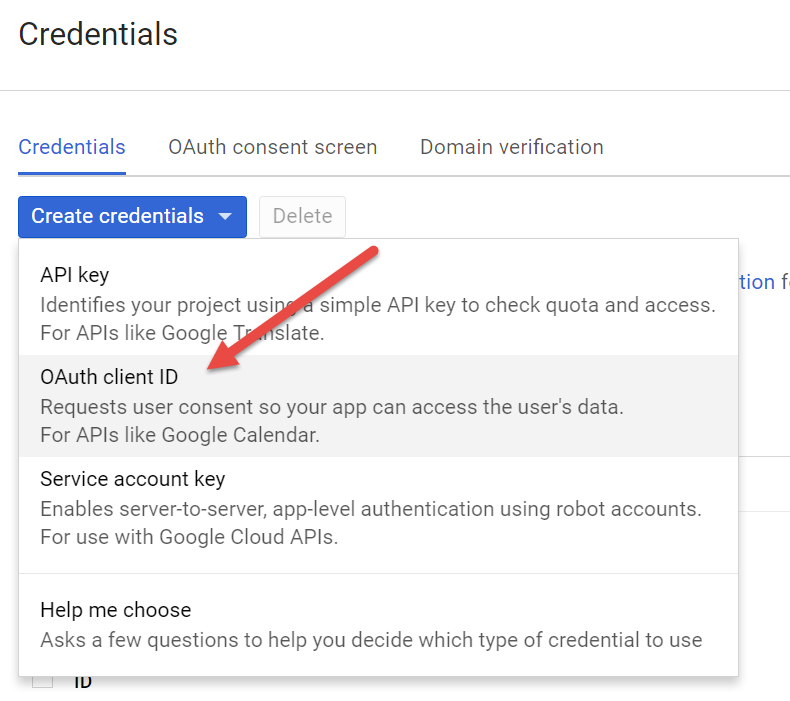
Before we can ask a user for permission, we have to first configure our application with a Client ID and Secret so that we have the necessary elements to complete the OAUTH workflow. This is done by visiting the API Console and creating a new OAUTH Client ID:
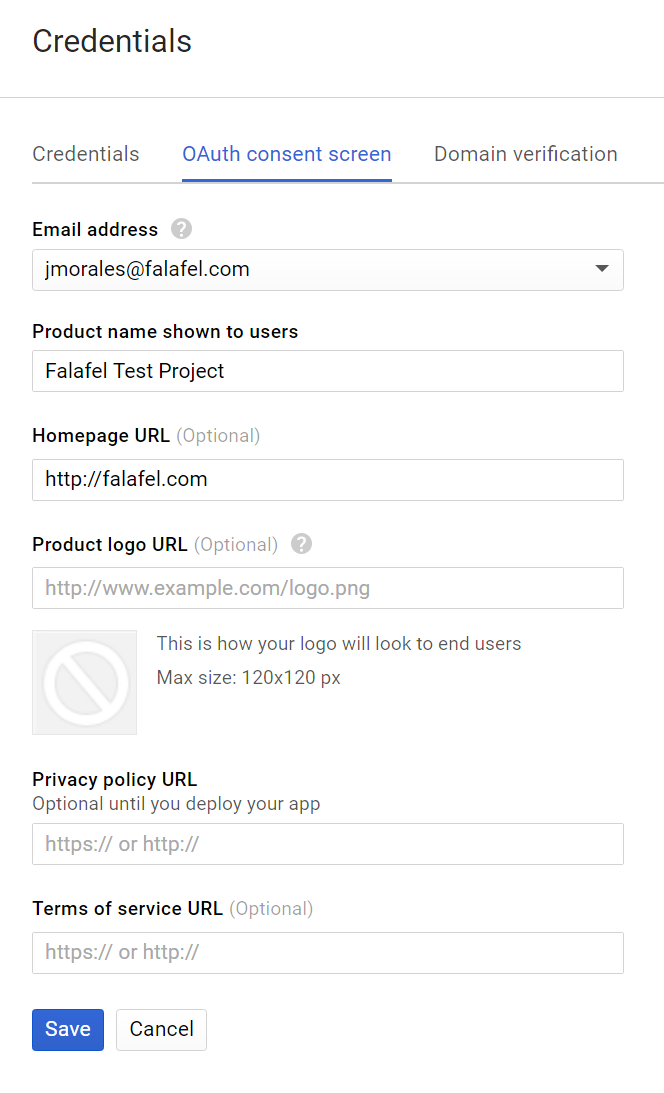
If you haven�t already configured your OAUTH consent screen, you�ll be prompted to do so. This is required because the authorization request needs to show the user the name of your application, so that it�s clear that you are the one asking for permission:
Now you can proceed to configure the new key, in this case for a Web Application. You need to specify a valid path (within your website) to receive the callback redirect URI to send the user after they grant permission:
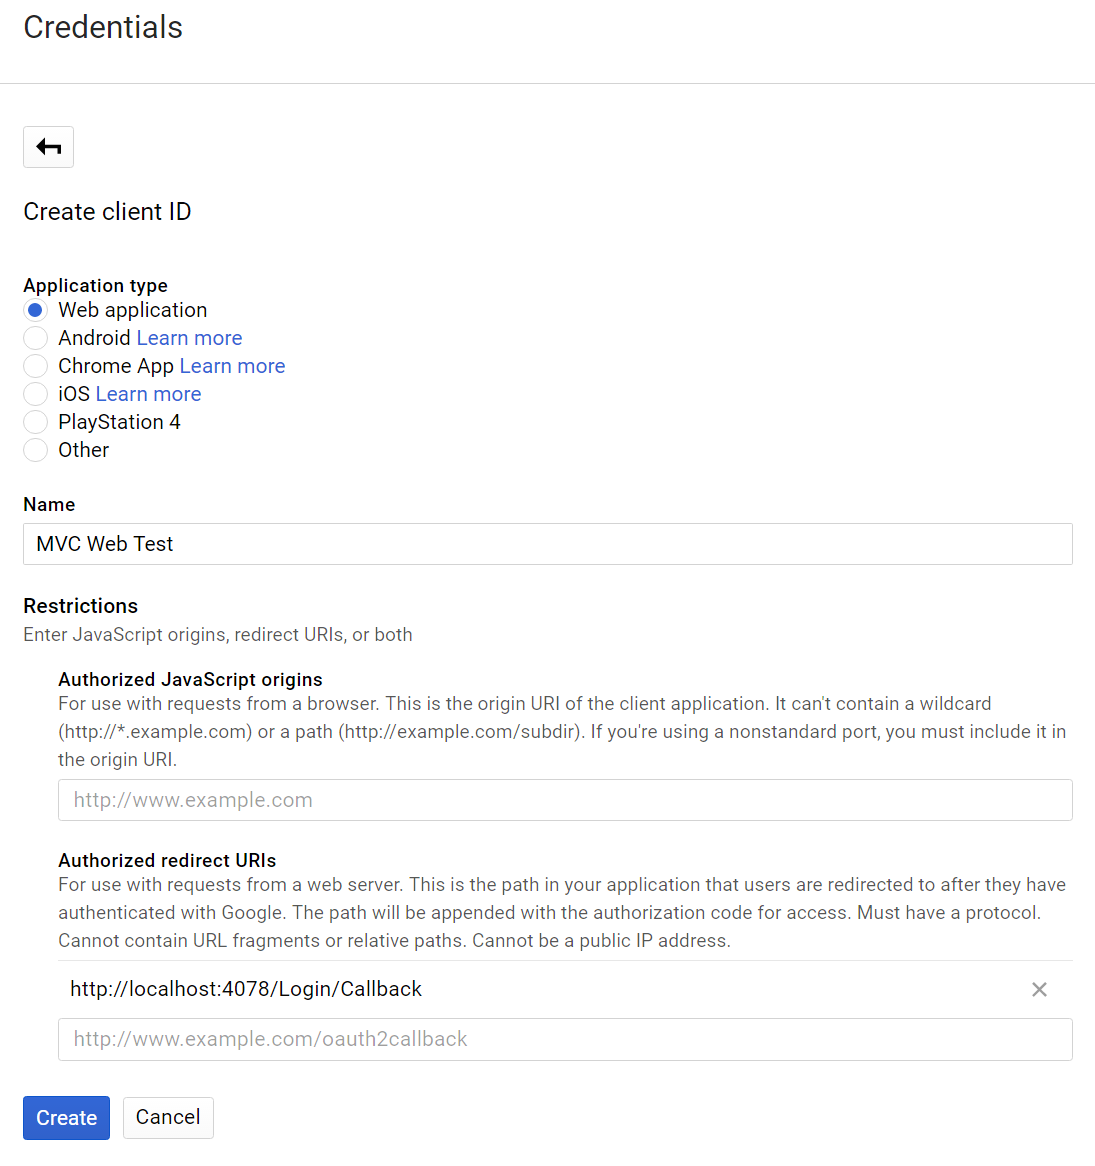
For our application, this is represented by the path:�http://localhost:4078/Login/Callback.
After a user authorizes our app to access their account, Google will redirect them back to this path to complete the OAUTH workflow, sending with it a code that we need to validate the request (more on this later).
Once this is configured, you�ll be given a Client ID and Secret that you�ll need to safely store where it�s accessible only by your site (and not checked into source control or otherwise published!).
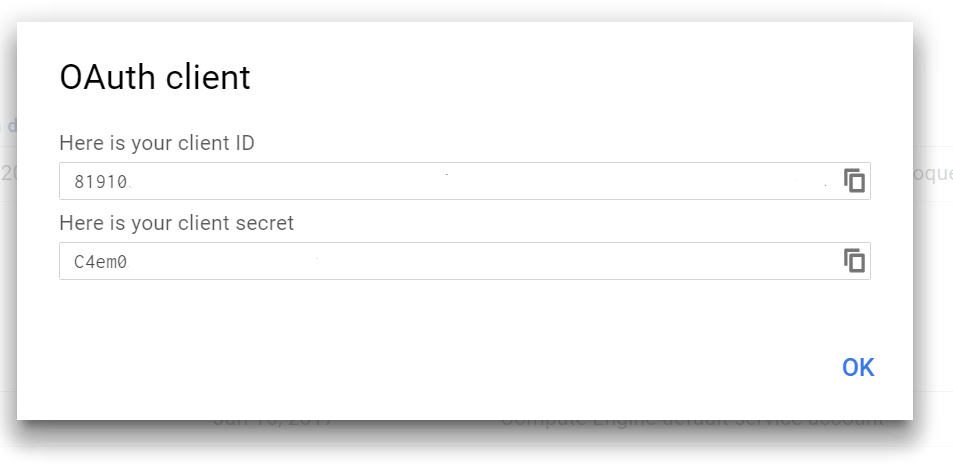
To keep things simple we�ll embed them in our code, but you�ll definitely want to protect this on a production site.
Authenticating the User
Now that our application is configured to properly request for access, we need to go ahead and create a way to initialize the OAUTH workflow for our users.
I added a simple LoginController that takes care of asking the user to authorize our application to access their account. This controller simply constructs the authorization URL on the trusted Google domain that the user will use to login and authorize the app.
Here�s what the code looks like for the Login Controller with this default action to start the authentication process:
public class LoginController : Controller
    {
        // CLIENT ID AND SECRETSHOULD NOT BE STORED IN CODE OR CONFIG, use Default Credentials or other safe method
        private const string CLIENT_ID = "[CLIENT-ID-KEY-FROM-API-MANAGER]";
        private const string CLIENT_SECRET = "[CLIENT-SECRET-KEY-FROM-API-MANAGER";

        // the bucket we're using to store images
        private const string BUCKET_NAME = "falafel-test-profile-images";

        public ActionResult Index()
        {
            // Build the login oauth url
            var scopes = "email profile";                               // what we want to access
            var redirectUrl = "http://localhost:4078/Login/Callback";   // the url to which Google should send the user back to complete authentication
            var clientID = CLIENT_ID;                                   // SHOULD BE IN A SAFE PLACE, NOT HERE!

            // redirect user to the login url
            var oauthUrl = string.Format("https://accounts.google.com/o/oauth2/v2/auth?scope={0}&redirect_uri={1}&response_type=code&client_id={2}", scopes, redirectUrl, clientID);
            return Redirect(oauthUrl);
        }
    }
When the user visits this page, they�ll be redirected to the constructed url, which will proceed to ask them to login and authorize your application (using the name you configured on the consent screen):
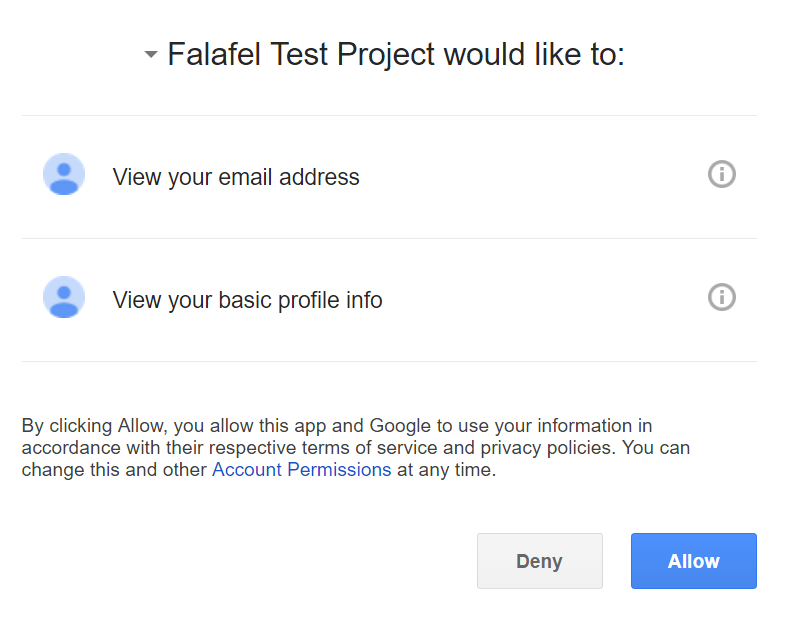
Once they grant access, Google will redirect them back to your site via the Callback URI that you configured when setting up the API credentials. It�s our job to take that code and validate it by posting it (along with our app Secret and other parameters that validate the code) to another Google endpoint.
Here�s the code for the Callback action that handles this request:
public async Task<ActionResult> Callback(string code)
        {
            // build the request to validate the incoming code
            var clientID = CLIENT_ID;                                   // from the Google API console, SHOULD BE IN A SAFE PLACE, NOT HERE!
            var clientSecret = CLIENT_SECRET;                           // from the Google API console, SHOULD BE IN A SAFE PLACE, NOT HERE!
            var redirectUri = "http://localhost:4078/Login/Callback";   // the original url we sent must match what we original set as the callback
            var grantType = "authorization_code";                       // this tells OAUTH we're using a code to validate


            // wrap parameters in a Form object
            var content = new FormUrlEncodedContent(new[]
            {
                new KeyValuePair<string, string>("code", code),   // the code we got from the callback
                new KeyValuePair<string, string>("client_id", clientID),
                new KeyValuePair<string, string>("client_secret", clientSecret),
                new KeyValuePair<string, string>("redirect_uri", redirectUri),
                new KeyValuePair<string, string>("grant_type", grantType),
            });

            // the url to send the POST request (from the google docs)
            var postUrl = "https://www.googleapis.com/oauth2/v4/token";

            // submit the request
            var client = new HttpClient();
            var result = await client.PostAsync(postUrl, content);

            // get the result as a string
            var resultContent = await result.Content.ReadAsStringAsync();

            // parse the result into an object
            var resultObject = new { access_token = "" };
            var json = JsonConvert.DeserializeAnonymousType(resultContent, resultObject);

            // use the token to get the user's profile
            var url = "https://www.googleapis.com/oauth2/v1/userinfo";
            client.DefaultRequestHeaders.Add("Authorization", "Bearer " + json.access_token);
            var response = await client.GetStringAsync(url);

            // parse the new result to get the profile
            var profileResultObject = new { picture = "", id = "" };
            var profileJson = JsonConvert.DeserializeAnonymousType(response, profileResultObject);

            // upload the image to the storage bucket
            await UploadProfileImage(profileJson.picture, profileJson.id);

            // redirect to a result page
            return RedirectToAction("Images", "Home");
        }
Once we have the user�s permission (via the�access_token�property) we can use that to get their profile information, including their profile image. We use the Google Cloud C# API (authorizing as we described in the previous topic) to upload that profile (via a Stream object) directly to our storage buckets.
This is the code for the�UploadProfileImage�method that performs the upload to Google storage:
private async Task UploadProfileImage(string url, string id)
        {
            // get the keyfile
            var path = Server.MapPath("~/Falafel Test Project-b53a21babe66.json");

            // authorize a client
            var credential = GoogleCredential.FromStream(new FileStream(path, FileMode.Open)).CreateScoped(new string[] { StorageService.Scope.DevstorageReadWrite });
            var storageClient = StorageClient.Create(credential);

            // set the destination bucket, file name and content type
            var destination = new Google.Apis.Storage.v1.Data.Object();
            destination.Bucket = BUCKET_NAME;
            destination.ContentType = "image/jpeg";
            destination.Name = id + ".jpg";

            // get the image stream
            var httpClient = new HttpClient();
            var resultStream = await httpClient.GetStreamAsync(url);

            // upload the stream to the destination bucket as public
            storageClient.UploadObject(destination, resultStream, new UploadObjectOptions() { PredefinedAcl = PredefinedObjectAcl.PublicRead });
        }
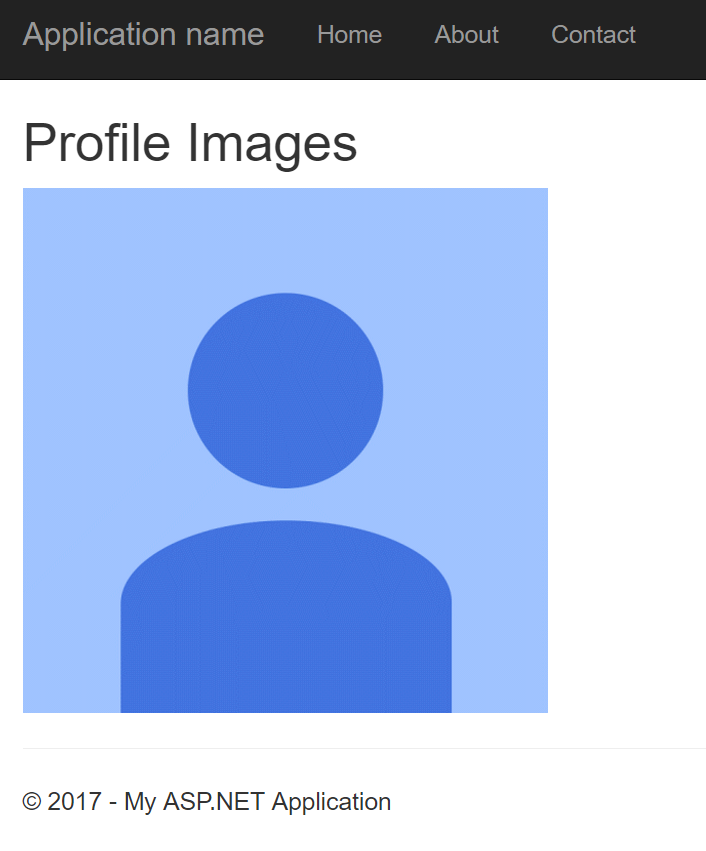
Finally, we redirect the user to new action on the Home controller that uses the same authentication to read the images uploaded to the bucket and show them to the user. Here is the code:
public ActionResult Images()
        {

            // the bucket we're using to store images
            var BUCKET_NAME = "falafel-test-profile-images";

            // get the keyfile
            var path = Server.MapPath("~/Falafel Test Project-b53a21babe66.json");

            // authorize a client
            var credential = GoogleCredential.FromStream(new FileStream(path, FileMode.Open)).CreateScoped(new string[] { StorageService.Scope.DevstorageReadOnly });
            var storageClient = StorageClient.Create(credential);

            PagedEnumerable<Objects, Google.Apis.Storage.v1.Data.Object> images = storageClient.ListObjects(BUCKET_NAME);

            return View(images);
        }
And here is what the resulting page looks like after our first user logs in:
Caveats and Wrapping Up
Of course, since this is a very simple example, we haven�t done any error checking (such as if the user has already uploaded their image), nor do we do any file locking to ensure multiple people aren�t attempting to read the key file (the result of which should probably be cached) which would probably cause an exception. If you were deploying this to a GCE or GAE instance, you could probably leverage the Default Application Credentials (from the previous topic) to authorize access to your storage account (which is certainly the recommended option)!
Finally, of course, we are embedding the Client ID and Secrets right inside our code, which is certainly a security risk and should never be done on a production site.
However, this hopefully shows how easy it is to authenticate a custom ASP.NET website to use both GCP services as well as client user accounts together to create a solution entirely driven by Google APIs.
A more thorough look at Google Storage and other Google services is coming soon, so stay tuned for more. In the meantime, as always, I hope this was helpful, and thanks for reading!