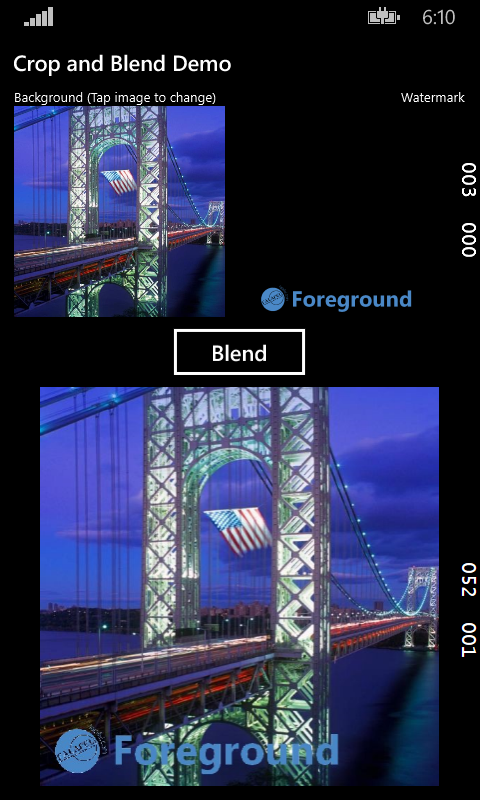
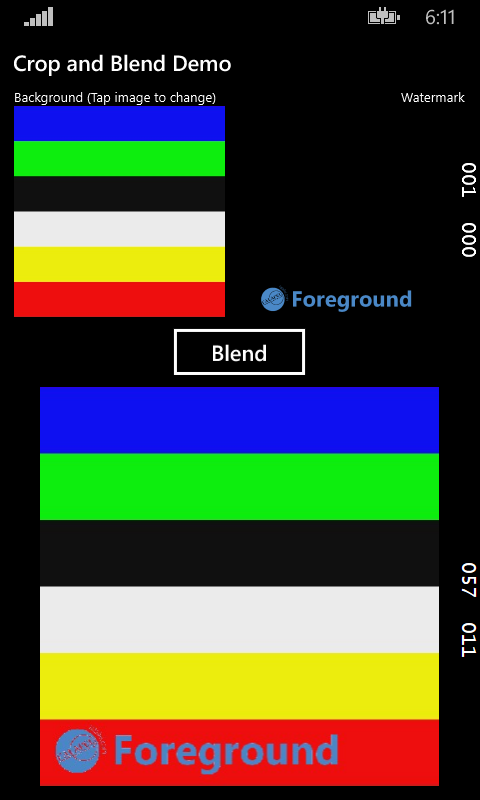
I recently needed the ability to combine two images on Windows Phone 8.1 (WinRT not Silverlight) so that one overlays the other, like a watermark. Because the watermark image was a fixed size and dimension, we also needed to make sure that the photo being merged shared the same aspect ratio (in this case a square).
Although I found many examples for cropping and blending in Silverlight, Windows 8.1, and Win32 (GDI+), none of them apply to Windows Phone 8.1 as it omits many of the required libraries and references.
One solution often suggested is to use XAML to layer the images on top of each other, and although this works visually, it doesn�t help if you actually need a merged photo, such as for upload to a service like Facebook or Instagram.
Fortunately in the end, I was able to leverage the Lumia Imaging SDK to perform both the cropping and the blending of the two images, and in this post we�ll look at some of the code that makes this happen. In addition, I�ve created a sample project that demonstrates the operations, available for download to anyone who might need it.
Despite the name, the Lumia Imaging SDK appears to be functional on non-Lumia devices, as we did test it successfully with an HTC device. However, the documentation doesn�t explicitly state that all devices are supported, so your mileage may vary�
Luima SDK Crop and Blend Demo Project
The sample project includes a fixed watermark image source, saved as content into the project so it is available in the installed application folder. It also includes a demo image (with thanks to Bing) to be blended.

Tapping the photo allows you to replace it (I used the emulator here):

And on my test device (Lumia 640) I used the camera to take and watermark a photo of my Roomba.

The original photo from my camera was actually at lot taller; it was automatically cropped so that it matches the watermark source.
Let�s look at how this is done.
Cropping the Image
The first thing we need to do is crop the image to match the aspect ratio of the watermark. In order to do that we must calculate the crop dimensions, the result of which will be a Rect object.
I wasn�t able to find a way to get the actual image dimensions without first loading it into memory, so the first thing to do is take the selected image and load it into a BitmapImage. We can then use the smaller side to determine the final dimensions, and center the Rect in that space.
private async Task<Rect> CalculateCrop(StorageFile file)

������� {

����������� using (var fileStream = await file.OpenAsync(FileAccessMode.Read))

����������� {

��������������� // create a temp bitmap to get the actual dimensions

� ��������������var bitmapImage = new BitmapImage();

��������������� bitmapImage.SetSource(fileStream);

��������������� // calculate the crop, which is a centered square from the smaller side

��������������� var desiredSideSize = Math.Min(bitmapImage.PixelWidth, bitmapImage.PixelHeight);

��������������� var centerX = (bitmapImage.PixelWidth - desiredSideSize) / 2;

��������������� var centerY = (bitmapImage.PixelHeight - desiredSideSize) / 2;

��������������� var cropRect = new Rect(centerX, centerY, desiredSideSize, desiredSideSize);

��������������� return cropRect;

����������� }

������� }
Once we have the Rect area to be cropped, we use the CropFilter effect in the Lumia Imaging SDK to render the photo as a Jpeg into memory.
private async Task<IBuffer> CropImage(StorageFile file)

������� {

����������� IBuffer bufferResult = null;

����������� // initialize the filtereffect for rendering the image

����������� using (var fileSource = new StorageFileImageSource(file))

����������� using (var filterEffect = new FilterEffect(fileSource))

����������� {

��������������� // initialize filters

��������������� var filters = new List<IFilter>();

��������������� // calculate and initialize crop

��������������� var cropRect = await CalculateCrop(file);

�������������� �var cropEffect = new CropFilter(cropRect);

��������������� // add crop effect to filters

��������������� filters.Add(cropEffect);

��������������� filterEffect.Filters = filters;

��������������� // render the cropped image

��������������� using (var jpegRenderer = new JpegRenderer(filterEffect))

��������������� {

������������������� bufferResult = await jpegRenderer.RenderAsync();

��������������� }

����������� }

����������� return bufferResult;

������� }
I�m returning the cropped image as an IBuffer so that we can use it both to update the View with a new BitmapImage, but also to pass it as a stream to the ViewModel. This way we can reuse that stream when we execute the actual blending of the two images, which we�ll see in the next section.
Now, all of this occurs after a user selects a photo with the FileOpenPicker, so here�s the continuation code that takes the selected image and calls the above methods to crop it, binding the result to the ViewModel as described.
public async void ContinueFileOpenPicker(FileOpenPickerContinuationEventArgs args)

������� {

����������� var file = args.Files.FirstOrDefault();

����������� if (file == null) return;

����������� bool success = true;

����������� try

����������� {

��������������� // crop image to a buffer

��������������� var croppedImageBuffer = await CropImage(file);

��������������� //// convert buffer to image stream for the ViewModel

��������������� ViewModel.BackgroundImageStream = croppedImageBuffer.AsStream();

��������������� //// convert the buffer to a BitmapImage to show on the screen

��������������� var bitmapImage = new BitmapImage();

��������������� var imageStream = croppedImageBuffer.AsStream().AsRandomAccessStream();

��������������� await bitmapImage.SetSourceAsync(imageStream);

���������� �����BackgroundImage.Source = bitmapImage;

��������������� // clear any previous blended image

��������������� ViewModel.MergedImage = null;

����������� }

����������� catch (Exception ex)

����������� {

��������������� success = false;

����������� }

���� �������if (!success)

����������� {

��������������� var messageBox = new MessageDialog("Unable to use selected image, please try again.");

��������������� await messageBox.ShowAsync();

����������� }

������� }
Once the selection is made, the user can click the Blend button, which triggers the corresponding command in the ViewModel to perform the merging of the images. Let�s look at that next.
Merging Images with the Blend Filter
This command is very straightforward; we simply take the source watermark file from storage and load it into StorageFileImageSource as the background image. Next we take the stream from the previous section and use it to create a StreamImageSource for the foreground picture.
Once both of those are loaded, we simply pass them as arguments to the BlendEffect, and use that to render a new jpeg of the blended image as another IBuffer.
Finally the resulting IBuffer is converted to a stream and loaded into a new BitmapImage so it can be shown on the screen. Here�s the complete merge command code:
public RelayCommand MergeImagesCommand

������� {

����������� get

����������� {

��������������� return this.mergeImagesCommand ??

������������������� (mergeImagesCommand = new RelayCommand(async () =>

����������������������� {

���������������������� �����IsLoading = true;

��������������������������� try

��������������������������� {

������������������������������� // load the watermark from the file system�����������������������������

������������������������������� string foregroundImagePath = @"Assets\ForegroundWatermark.png";����������������������������

������������������������������� StorageFile foregroundImage = await installationFolder.GetFileAsync(foregroundImagePath);

������������������������������� // load the background image into memory

������������������������������� using (var backgroundImageSource = new StreamImageSource(BackgroundImageStream))

������������������������������� using (var foregroundImageSource = new StorageFileImageSource(foregroundImage))

������������������������������ �using (var effect = new BlendEffect(backgroundImageSource, foregroundImageSource, BlendFunction.Normal))

������������������������������� using (var renderer = new JpegRenderer(effect))

������������������������������� {

����������������������������������� // Jpeg renderer gives the raw buffer containing the filtered image.

����������������������������������� IBuffer jpegBuffer = await renderer.RenderAsync();

����������������������������������� // converting to bytes allows you to post the merged photo to a web service

����������������������������������� //var bytes = jpegBuffer.ToArray();

����������������������������������� // convert the buffer to a stream

����������������������������������� var imageStream = jpegBuffer.AsStream().AsRandomAccessStream();

����������������������������������� // load the stream into a new bitmap

����������������������������������� MergedImage = new BitmapImage();

����������������������������������� await MergedImage.SetSourceAsync(imageStream);

������������������������������� }

��������������������������� }

��������������������������� catch (Exception ex)

��������������������������� {

������������������������������� Debug.WriteLine(ex.ToString());

��������������������������� }

����������� ����������������finally

��������������������������� {

������������������������������� IsLoading = false;

��������������������������� }

����������������������� }, () => IsValidImages));

����������� }

������� }
The same IBuffer result could also be converted to a Byte array (with the commented out ToArray() extension method), which is useful if you need to post the merged photo to a webservice (like Facebook or Instagram).
This sample could also easily be modified to save the merged photo to storage, the user�s library, as well as to use two StorageFileImageSource objects to allow any two user-selected photos to be merged. I�ll leave that as an exercise for the reader (be sure and share your results in the comments!).
Wrapping Up and Project Download
The Lumia Imaging SDK helps to close the gap on some of the missing libraries and functionality in Windows Phone 8.1, offering a wide variety of filters and effects that can be applied to images, as well as basic operations that would otherwise not be possible on Windows Phone.
Be sure to grab the sample project!
And share any feedback in the comments below. As always, I hope this was helpful, and thanks for reading.