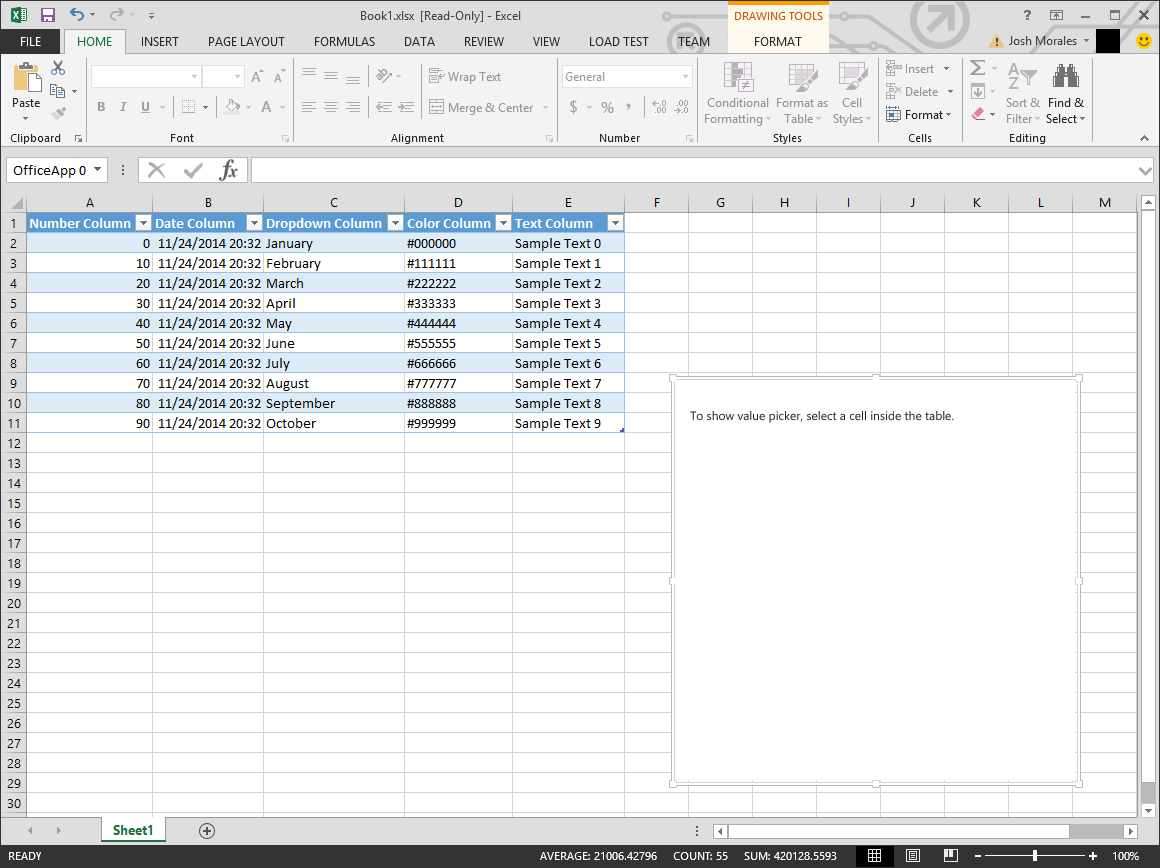
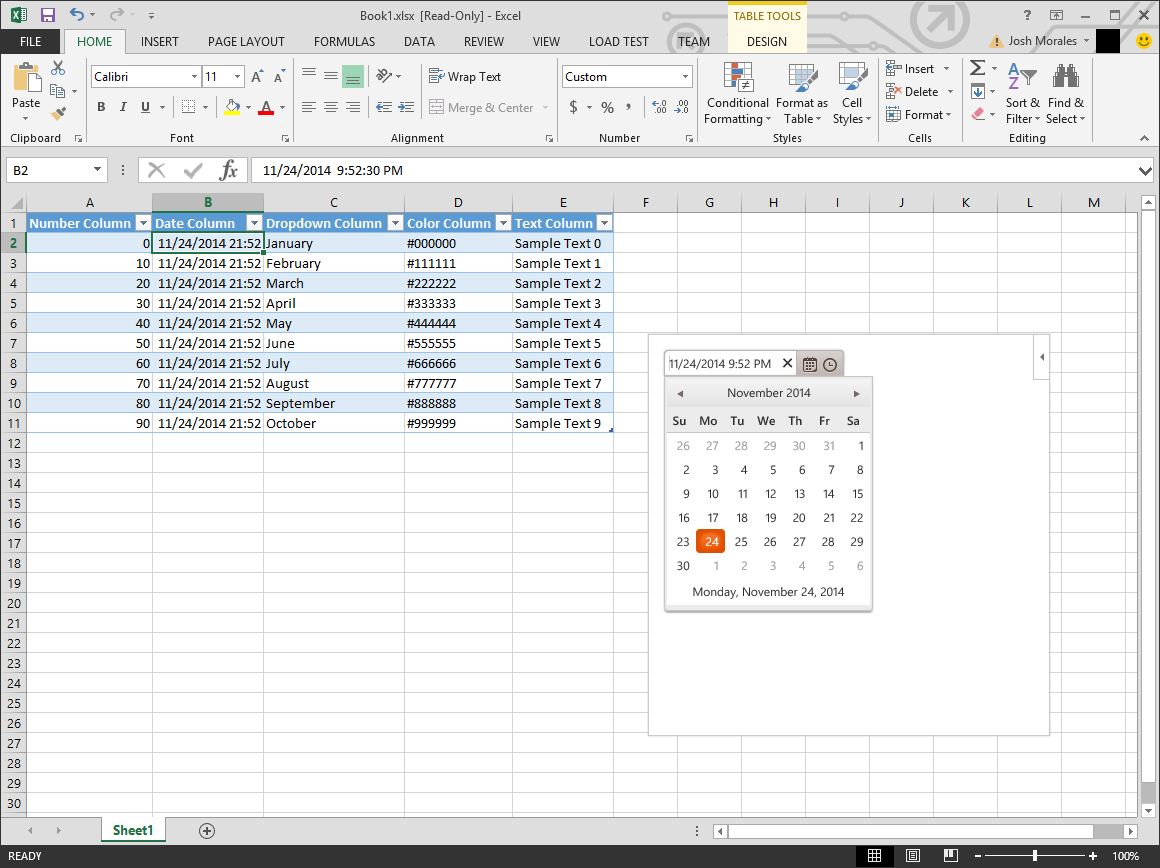
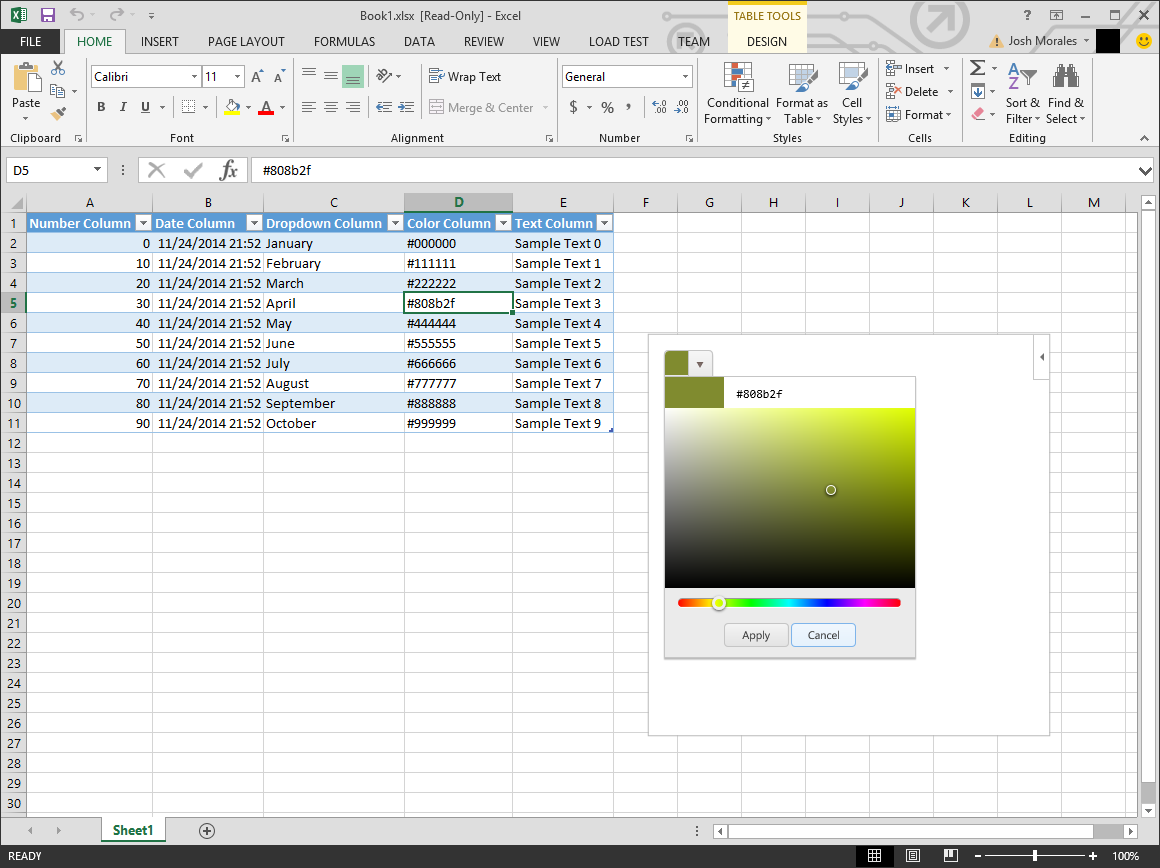
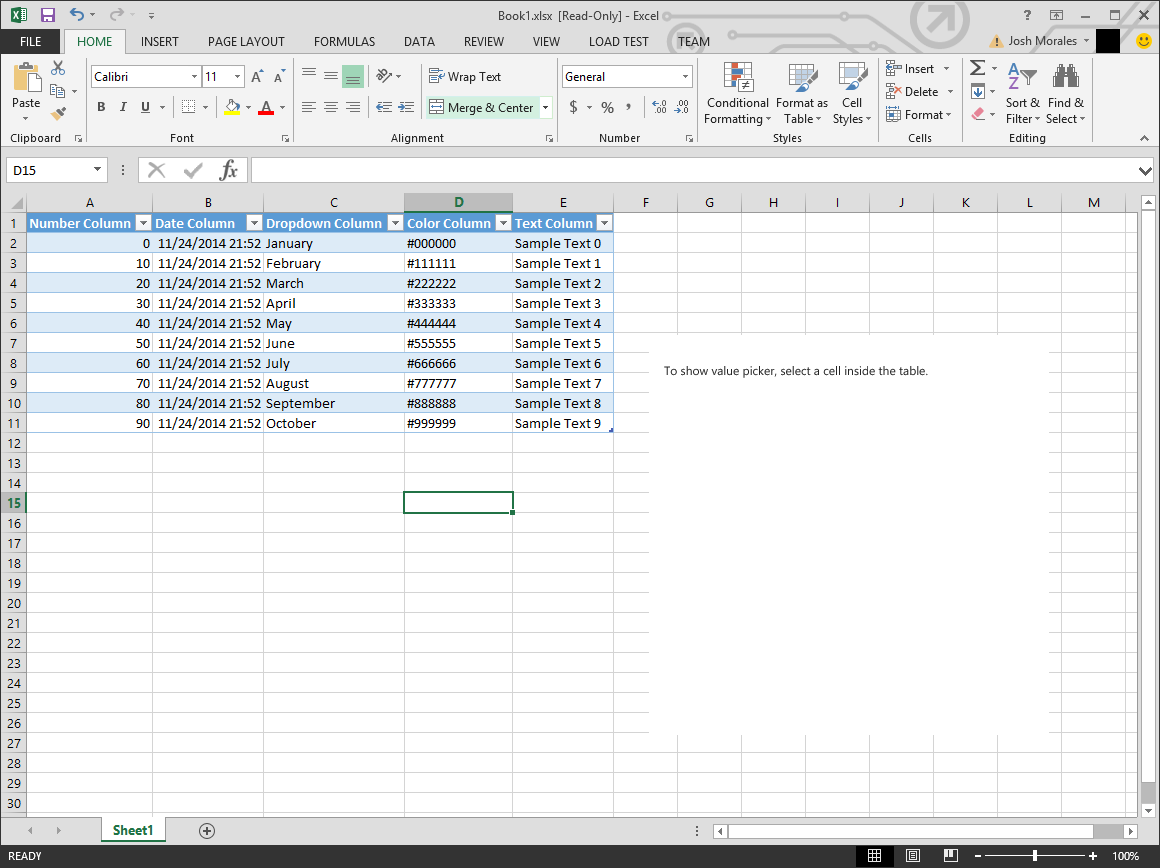
This post continues the deep dive into developing Apps for Office by demonstrating how to create a Content App that runs in Microsoft Excel. The app we build today demonstrates how to work with the Office API within Microsoft Excel to accomplish tasks such as creating tables, binding to selections, and communicating between the document and your app using MVVM.
This particular example makes use of the Kendo UI Core framework, as well as Moment.js to work with dates in JavaScript. The app is designed to present a dialog box to select values from an appropriate picker instead of having to enter values manually.
Since we�ve already reviewed how to get started, let�s dive right into the code.
Create the Project
This time we need to create a new App for Office project in Visual studio and select the Content App, choosing Content as the app type, and targeting Excel (since we are working specifically with tables and cells).
For the UI, we need a few different inputs for the various types of selectors we want to present. The markup below for the main page of the app defines several inputs using different Kendo UI controls with declarative syntax.
<div id="content-main">

������� <div class="padding">

����������� <div id="instructions">

��������������� <p>To show value picker, select a cell inside the table.</p>

����������� </div>

����������� <div class="input slider">

��������������� <input id="slider" data-role="slider" data-min="0" data-max="100" data-small-step="1" data-large-step="10" data-bind="value: value, events: { change: writeValue }" />

����������� </div>

����������� <div class="input datetimepicker">

��������������� <input id="datetimepicker" data-role="datetimepicker" data-bind="value: value, events: { change: writeValue }" />

����������� </div>

����������� <div class="input dropdownlist">

��������������� <input id="dropdownlist" data-role="dropdownlist" data-bind="value: value, source: months, events: { change: writeValue }" />

����������� </div>

����������� <div class="input colorpicker">

��������������� <input id="colorpicker" data-role="colorpicker" data-bind="value: value, events: { change: writeValue }" />

����������� </div>

����������� <div class="input text">

��������������� <input id="text" type="text" data-bind="value: value, events: { change: writeValue }" />

����������� </div>

������� </div>

��� </div>
Notice that we�re also using the databinding syntax provided by Kendo UI. We�ll bind to a corresponding ViewModel as different cells are selected in the document to show or hide the appropriate selectors.
Creating the ViewModels
There are many ways we could implement the behavior we want, but to keep things simple and focused on the API, I created an array of five ViewModels, named to match the selector type and input ID. This way, we can reference them by name later in the app.
They each share the same properties, but have different implementations for the writeValue method to work with the modified data in the correct format for the control using the setSelectedDataAsync method of the API.
var viewModels = {

������� slider: kendo.observable({

����������� value: 0,

����������� writeValue: function (e) {

��������������� Office.context.document.setSelectedDataAsync(e.value);

����������� }

������� }),

������� datetimepicker: kendo.observable({

����������� value: new Date(),

����������� writeValue: function (e) {

��������������� var d = moment($(e.sender.element).data("kendoDateTimePicker").value());

��������������� Office.context.document.setSelectedDataAsync(d.format("MM/DD/YYYY hh:mm"));

����������� }

������� }),

������� dropdownlist: kendo.observable({

����������� value: '',

����������� months: ['January', 'February', 'March', 'April', 'May', 'June', 'July', 'August', 'September', 'October', 'November', 'December', 'Smarch'],

����������� writeValue: function (e) {

��������������� var val = $(e.sender.element).data("kendoDropDownList").value()

��������������� Office.context.document.setSelectedDataAsync(val);

����������� }

������� }),

������� colorpicker: kendo.observable({

����������� value: '',

����������� writeValue: function (e) {

��������������� var val = $(e.sender.element).data("kendoColorPicker").value()

��������������� Office.context.document.setSelectedDataAsync(val);

����������� }

������� }),

������� text: kendo.observable({

����������� value: '',

����������� writeValue: function (e) {

��������������� var val = $(e.currentTarget).val()

��������������� Office.context.document.setSelectedDataAsync(val);

����������� }

������� })

��� };
We also need a way to map each cell to a specific selector, so that selecting a cell in a specific column displays that input with the selected value automatically. We accomplished this in the code by creating a two-dimensional array that represents a table of values (which we will be creating shortly).
var bindings = [[]];

��� var currentCell = {};
The values in each cell will tell the Content App which selector to use for the currentCell that is updated with each selection. We�ll see how this is done later in the post, but first we need to build the aforementioned table.
Creating a Table with the Office API
We want to be able to detect both any change in the selection of cells, as well content within, so that we can present and update the appropriate selector. Although the document itself exposes events to monitor these changes, they do not by default provide any context such as the specific cell that is selected, or additional metadata we need (such as the type of selector to show).
Since this information is required for us to show the correct selector, we can first create and add a sample table to the document so that we can have a well-defined area to work with. By creating such a table, we now have a specific container that gives us additional context when things happen. This is done by taking advantage of a feature of the Office API called Bindings.
Binding Object
The Office API allows you to define a specific region inside a document to monitor for behaviors such as selection and content changes by creating a Binding object. A Binding exposes two events, one for when a selection within the binding changes, and another when changes are made to its content.
There are also specific types of Binding objects, including the TableBinding, which we will be using for this example. TableBinding exposes properties relevant and useful when working with a defined table region, such as column and row counts.
Bindings can be created in several ways, for example by referencing an existing, named item in your document (such as a Sheet or existing Excel table). They can also be created from a selection, which works well when you are creating objects on the fly as we are, because any created object is automatically selected when inserted with the API.
So in order for this to work for our app, we first need to create an instance of the TableData object with a few columns and rows, write it to the selected area in the document on startup, and finally creating a new binding from that selection.
Office.initialize = function (reason) {

������� $(document).ready(function () {

����������� app.initialize();

����������� createTable();

������� });

��� };

��� function createTable() {

������� var myTable = new Office.TableData();

������� myTable.headers = [["Number Column", "Date Column", "Dropdown Column", "Color Column", "Text Column"]];

������� myTable.rows = [];

������� // add a few blank rows

������� for (var i = 0; i < 10; i++) {

����������� bindings[i] = ['slider', 'datetimepicker', 'dropdownlist', 'colorpicker', 'text'];

����������� myTable.rows.push([i * 10, new Date(), viewModels.dropdownlist.months[i], '#' + i + i + i + i + i + i, 'Sample Text ' + i]);

������� }

������� Office.context.document.setSelectedDataAsync(myTable, bindTable);

��� }
Notice that in addition to populating the table with sample data, we also load the appropriate selector value into the bindings array we defined earlier to map the column cell to the appropriate selector.

Finally as we mentioned before, writing the table to the document also creates a selection of it. As a result we can use the callback function to immediately create a binding of that selection, which represents the table.
function bindTable(e) {

������� Office.context.document.bindings.addFromSelectionAsync(Office.BindingType.Table, { id: 'employeeTable' }, function (asyncResult) {

����������� if (asyncResult.status === Office.AsyncResultStatus.Failed) {

��������������� var error = asyncResult.error;

��������������� app.showNotification("Error", error.name + ": " + error.message);

����������� } else {

��������������� // bind selection changes to react to cell selection

����������� }

������� });

��� }
Now when the app is launched, we are presented with a generated table with sample data and a mapping to show the appropriate selector.
The only thing left is to handle the selection events so that we can update the Content App and show the selector and value, as well as write any changed values from the selectors back to the document.
Selection Events
Now that we have a table bound to our app via the API, we can listen for selection events by attaching a handler to the binding. However, this event only fires anytime a selection is made within the bound table. Selections outside the table would not be useful to the app, and the selector should not be shown, but there is no event to handle this.
Fortunately, there is the existing document selection event, which fires on any selection regardless of whether or not it happens in a binding. By adding a global variable we can check if both events are fired, or if only the document selection occurred; only when both fire should we be displayed with the appropriate selector.
We do this by attaching both handlers inside the bindTable function when the binding is created:
// bind selection changes to react to cell selection

�� �������������asyncResult.value.addHandlerAsync(Office.EventType.BindingSelectionChanged, bindingChanged);

��������������� Office.context.document.addHandlerAsync(Office.EventType.DocumentSelectionChanged, documentSelectionChanged);
When a binding selection occurs, we land in the bindingChanged handler. Because this is a TableBinding, the argument passed to it includes the necessary information about the selection, including the starting row and column. We then use this position to retrieve the selector value from our mapping object at the same index.
Finally, we call the getSelectedDataAsync to retrieve the actual value so that we can update the corresponding selector (when it is shown) with that value. However, there�s one important situation we need to be aware of when selecting data in Excel.
Excel Content Formatting
If we use the default method of selecting data for a cell that contains a date in Excel, we will actually get a numerical value instead of the expected date as a string. This is because the date in Excel is saved as formatted text, and we must instruct the API to treat it as such when it is retrieved.
Fortunately we can easily do this by adding a new parameter to the options argument called valueFormat. This parameter tells the API to retrieve the content as formatted text if it is a date. All of this happens in the bindingChanged event we wired up before.
var selectionIsBinding = false;

��� function bindingChanged(e) {

������� selectionIsBinding = true;

������� currentCell.col = e.startColumn;

������� currentCell.row = e.startRow;

������� var b = bindings[currentCell.row][currentCell.col];

������� if (b === 'datetimepicker')

����������� Office.context.document.getSelectedDataAsync(Office.CoercionType.Text, { asyncContext: b, valueFormat: Office.ValueFormat.Formatted }, bindSelection);

������� else

����������� Office.context.document.getSelectedDataAsync(Office.CoercionType.Text, { asyncContext: b }, bindSelection);

��� }
Note also that we are passing the selected binding via the asyncContext property so we can reuse it on the selected data in the callback.
Toggle the Selector Visibility
The only thing that remains is to show or hide the appropriate selectors in the app. This is done with simple JavaScript by inspecting the asyncContext which contains the value of the binding and then binding the appropriate ViewModel to the input field.
function bindSelection(e) {

������� $(".input").hide();

������� var b = e.asyncContext;

������� kendo.unbind($("." + b));

������� kendo.bind($("." + b), vm);

������� $("." + b).show();

������� var vm = viewModels[b];

������� if (b === "datetimepicker")

����������� vm.set("value", moment(e.value).format("MM/DD/YYYY hh:mm A"));

������� else

����������� vm.set("value", e.value);

������� kendo.unbind($("." + b));

������� kendo.bind($("." + b), vm);

������� $("." + b).show();

��� }
Finally, we define the document selection handler, which again is responsible for updating the app when nothing is selected.
function documentSelectionChanged(e) {

����� ��if (selectionIsBinding) {

����������� $("#instructions").hide();

������� } else {

����������� nothingSelected();

������� }

������� selectionIsBinding = false;

��� }

��� function nothingSelected() {

������� $("#header").hide();

������� $('.input').hide();

������� $('#instructions').show();

��� }
The Kendo UI bindings automatically call the writeValue methods from the appropriate ViewModel for the selector, so at this point our app is complete! Launching and selecting a cell reveals the selector appropriate for the cell, and selecting outside of the table updates the app as expected.


Wrapping Up and Next Steps
Once again, with just a bit of HTML and JavaScript we demonstrated how Office can be extended to add useful features and behaviors. In addition, we were able to leverage existing frameworks like Kendo UI and Moment.js to easily add additional functionality just like you could with any website.
To download is available for download here: Excel Content App for Office Demo
In our final example, we�ll see how to extend Outlook by creating a Mail App to add additional functionality and context to your inbox.