We continue our journey through Apps for Office with a quick tour through some of the API features in Outlook by reviewing another simple App demo. Like the Excel app, this one is not designed to solve any particular problem, but rather demonstrate some of the functionality exposed to Mail Apps. The full source code will also available be for review in the next post covering Compose mode.
Since we already looked at how to get started creating a Mail App project, let�s dive straight into the sample project. We�ll be expanding on the project we created previously, which is set to activate in both Read and Compose mode. Today we�ll look at the Read Mode and finish off with Compose in our next post.
Once again we�ll also be leveraging the Kendo UI Core widgets to help layout and navigate the different areas of the app, which is already referenced via the CDN in the sample project.
Read Mode
As we discussed in Part 1 of the Mail Apps for Office post, there are several Known Types of content, which can be discovered and acted upon by a Mail App in Read Mode. By leveraging these common types, you can create apps that react to different types of content.
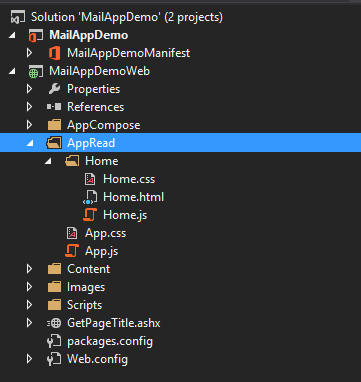
We�ll add such features to our app by editing the Home.html and Home.js files in the AppRead section of the sample app that we created.
The first thing we need to do is create a UI for the app, which we�ll arrange into a TabStrip, with one tab for each type of content we are detecting from the selected message or appointment.
We�ll use the API to find matching content in the message (which we�ll see shortly), then bind it via a ViewModel to the tabs using Kendo Templates to display the content in useful ways. Here is the full code for the UI:
<div id="tabstrip" data-role="tabstrip">

��������������� <ul>

������������������� <li class="k-state-active details">

����������������������� <h4>Message Content</h4>

������������������� </li>

������������������� <li class="attachments">

����������������������� <h4>Attachments</h4>

������������������� </li>

������������������� <li class="phonenumbers">

����������������������� <h4>Phone Numbers</h4>

������������������� </li>

������������������� <li class="websites"><h4>Websites</h4></li>

������������������� <li class="addresses"><h4>Addresses</h4></li>

������������������� <li class="contacts"><h4>Contacts</h4></li>

������������������� <li class="emails"><h4>Email Addresses</h4></li>

������������������� <li class="tasks"><h4>Tasks</h4></li>

������������������� <li class="meetings"><h4>Meetings</h4></li>

��������������� </ul>

��������������� <div class="details">

������������������� <ul>

����������������������� <li>

��������������������������� Subject:

����������������� ����������<span id="subject"></span>

����������������������� </li>

����������������������� <li>

��������������������������� From:

��������������������������� <span id="from"></span>

����������������������� </li>

������������������� </ul>

��������������� </div>

��������������� <div class="attachments">

������������������� <ul data-template="attachments-template" data-bind="source: attachments"></ul>

��������������� </div>

��������������� <div id="phonenumbers" class="phonenumbers">

������������������� <ul data-template="phonenumbers-template" data-bind="source: phonenumbers"></ul>

��������������� </div>

��������������� <div class="websites">

������������������� <ul data-template="websites-template" data-bind="source: websites"></ul>

��������������� </div>

�� �������������<div class="addresses">

������������������� <ul data-template="addresses-template" data-bind="source: addresses"></ul>

��������������� </div>

��������������� <div class="contacts">

������������������� <div data-template="contacts-template" data-bind="source: contacts"></div>

��������������� </div>

��������������� <div class="emails">

������������������� <ul data-template="emails-template" data-bind="source: emails"></ul>

��������������� </div>

��������������� <div class="tasks">

�������������� �����<ul data-template="tasks-template" data-bind="source: tasks"></ul>

��������������� </div>

��������������� <div class="meetings">

������������������� <ul data-template="meetings-template" data-bind="source: meetings"></ul>

��������������� </div>

����� ������</div>
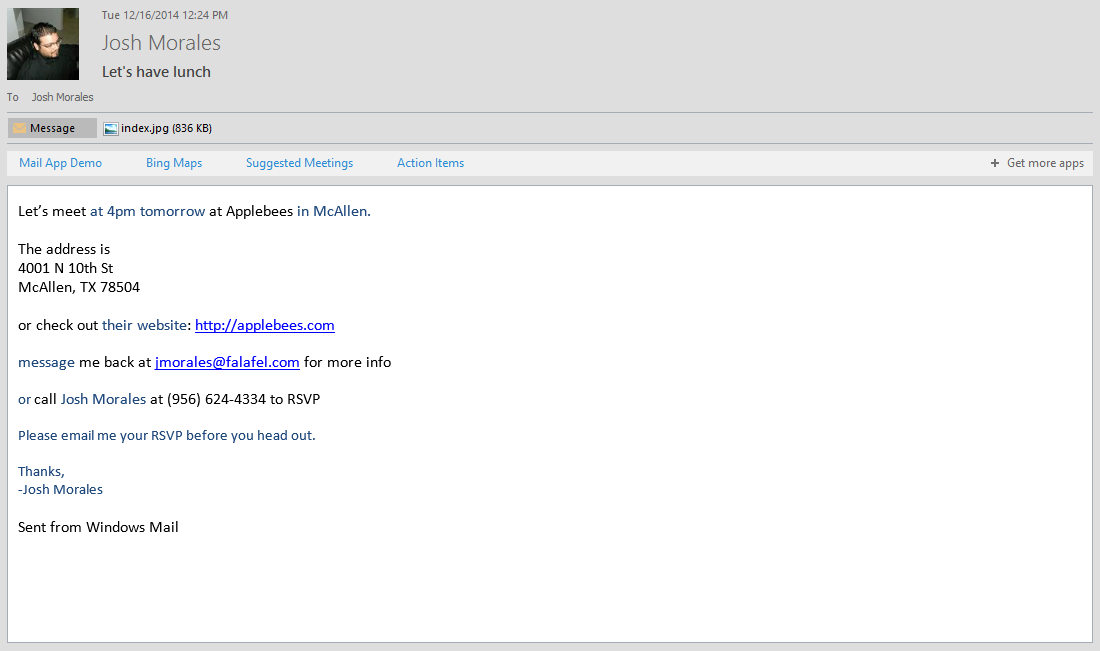
For this app I�ve also created a test message that contains several instances of Known Entity text content that should enable the different tabs in the app.
We first need to define the ViewModel and functions to retrieve the content from the selected Outlook item to fill the ViewModel properties.
The sample app generated by Visual Studio when we created the project already shows how you can retrieve simple message properties:
// Displays the "Subject" and "From" fields, based on the current mail item

��� function displayItemDetails() {

������� var item = Office.cast.item.toItemRead(Office.context.mailbox.item);

������� $('#subject').text(item.subject);

������� var from;

������� if (item.itemType === Office.MailboxEnums.ItemType.Message) {

����������� from = Office.cast.item.toMessageRead(item).from;

������� } else if (item.itemType === Office.MailboxEnums.ItemType.Appointment) {

����������� from = Office.cast.item.toAppointmentRead(item).organizer;

������� }

������� if (from) {

����������� $('#from').text(from.displayName);

����������� $('#from').click(function () {

��������������� app.showNotification(from.displayName, from.emailAddress);

����������� });

������� }

��� }
So we�ll supplement this with our own functions to bind the list of different content items in our test message. Here�s the updated code; we�ll look at the individual bind functions next.
var vm = kendo.observable({

������� attachments: [],

������� phonenumbers: [],

������� websites: [],

������� addresses: [],

������� contacts: [],

������� emails: [],

������� tasks: [],

������� meetings: []

��� });

��� // The Office initialize function must be run each time a new page is loaded

��� Office.initialize = function (reason) {

������� $(document).ready(function () {

����������� app.initialize();

����������� displayItemDetails();

����������� bindEntities();

����������� kendo.bind($("#content-main"), vm);

������� });

��� };

��� function bindEntities() {

������� var entities = Office.context.mailbox.item.getEntities();

������� if (entities === null) {

����������� hideAllTabs();

����������� return;

������� }

������� bindAttachments();

������� bindPhoneNumbers(entities);

������� bindWebsites(entities);

������� bindAddresses(entities);

������� bindContacts(entities);

������� bindEmails(entities);

������� bindTasks(entities);

������� bindMeetings(entities);

��� }
GetEntities
Rather than retrieve individual types of content, we can leverage a helpful method on the mailbox object, Office.context.mailbox.item.getEntities(), which returns an object with property arrays for all known entity types.
If such items are found, the array will contain the matching entries, which we can then push into the corresponding ViewModel property to be bound to the UI. Most of these content types are fairly straight forward, so we can simply define them here.
function bindAttachments(entities) {

������� var attachments = Office.context.mailbox.item.attachments;

������� if (attachments === undefined || attachments === null || attachments.length === 0) {

����������� $(".attachments").hide();

����������� return;

������� }

������� $.each(attachments, function (i, v) {

����������� var attachment = { type: v.attachmentType, mime: v.contentType, name: v.name, size: v.size };

����������� vm.attachments.push(attachment);

������� });

��� }

��� function bindPhoneNumbers(entities) {

������� if (entities.phoneNumbers === null || entities.phoneNumbers === undefined || entities.phoneNumbers.length === 0) {

����������� $(".phonenumbers").hide();

����������� return;

������� }

������� $.each(entities.phoneNumbers, function (i, v) {

����������� vm.phonenumbers.push({ phone: v.phoneString, text: v.originalPhoneString });

������� });

��� }

��� function bindAddresses(entities) {

������� if (entities.addresses === null || entities.addresses === undefined || entities.addresses.length === 0) {

����������� $(".addresses").hide();

����������� return;

������� }

��� ����$.each(entities.addresses, function (i, v) {

����������� vm.addresses.push(v);

������� });

��� }

��� function bindContacts(entities) {

������� if (entities.contacts === null || entities.contacts === undefined || entities.contacts.length === 0) {

���� �������$(".contacts").hide();

����������� return;

������� }

������� $.each(entities.contacts, function (i, v) {

����������� var contact = { name: v.personName, business: v.businessName };

����������� contact.address = (v.addresses.length) ? v.addresses[0] : "";

����������� contact.email = (v.emailAddresses.length) ? v.emailAddresses[0] : "";

����������� contact.phone = (v.phoneNumbers.length) ? v.phoneNumbers[0].phoneString : "";

����������� vm.contacts.push(contact);

������� });

��� }

��� function bindEmails(entities) {

������� if (entities.emailAddresses === null || entities.emailAddresses === undefined || entities.emailAddresses.length === 0) {

����������� $(".emails").hide();

����������� return;

������� }

������� $.each(entities.emailAddresses, function (i, v) {

����������� vm.emails.push(v);

������� });

��� }
For the most part we can simply pass the entities to the ViewModel. Some entities, such as Contacts, are more complex, and to ensure that we only have the data we need, we map them to a simple JSON object as shown in the code sample above.
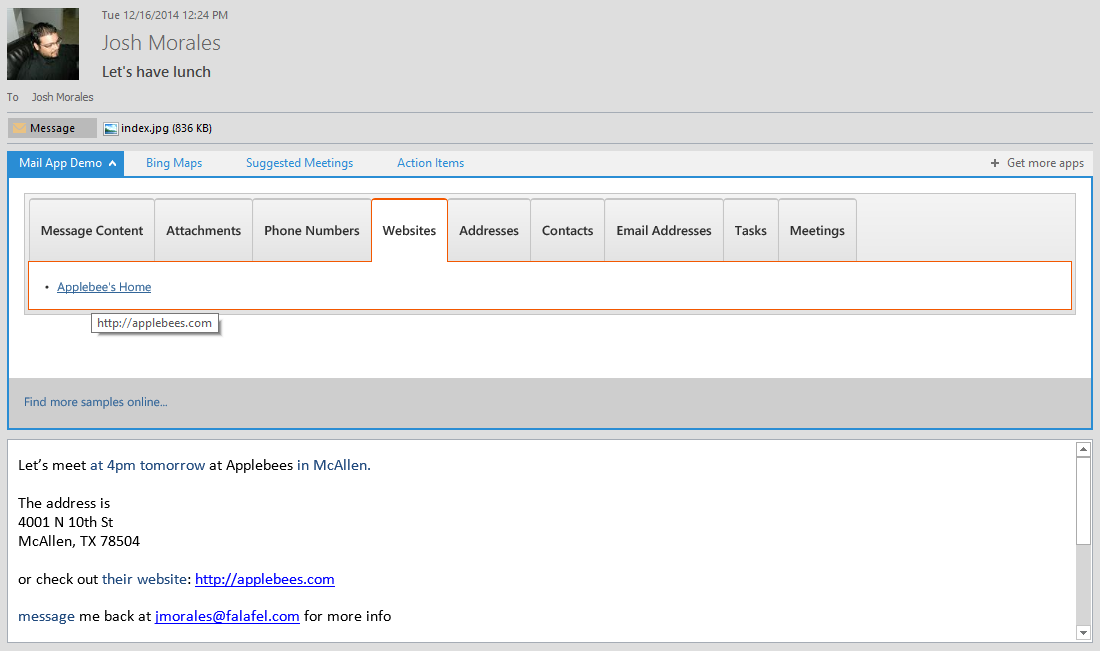
Launching the app reveals each of these tabs along with the detected content.
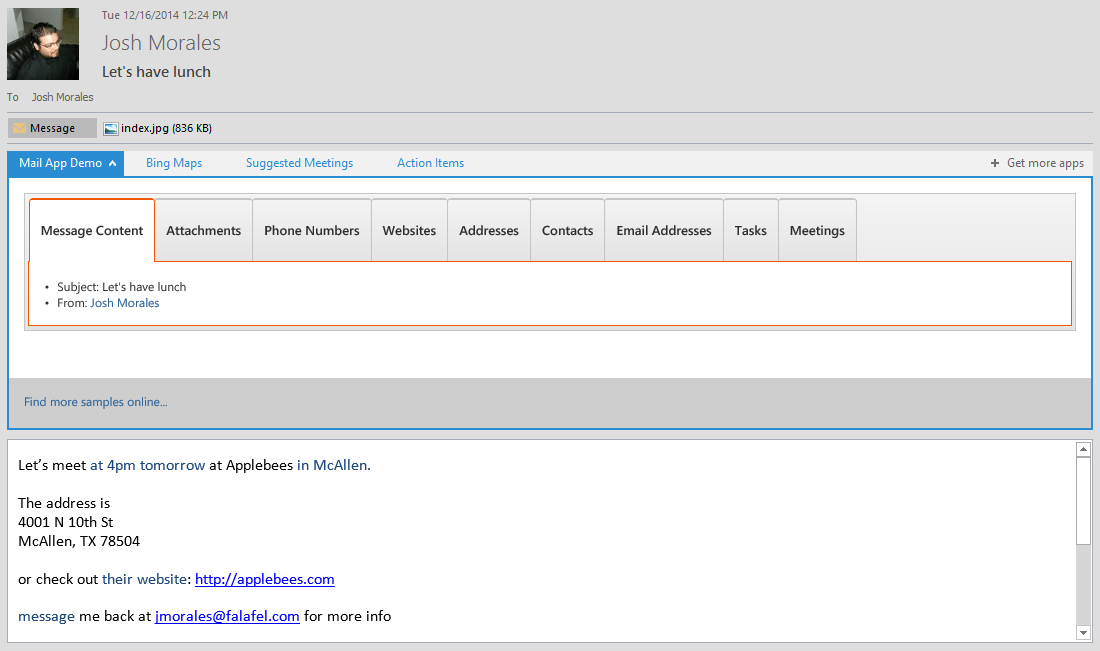
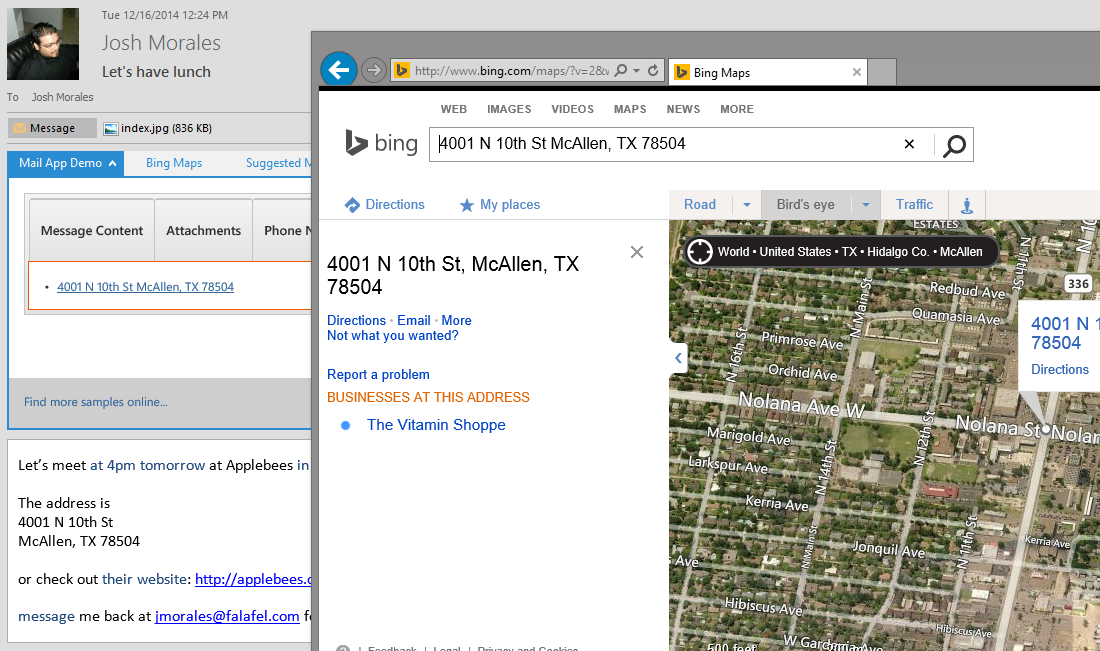
You can leverage this content in any way that makes sense for your app. Using Addresses as an example, the app will link to a Bing map of the location, which opens in a separate browser window.
However, for URLs, I want to highlight once again that Mail Apps are not limited to simply interacting with the found content within the application. Just like all Apps for Office, Mail Apps are simply websites, running HTML and JavaScript, and can even run server-side code, allowing you to reach beyond the app to perform intensive calculations, or retrieve and process external content.
To demonstrate this, this app contains a simple Http Handler (ASHX) which accepts a URL to download and extract the page title, returning it to the app so that it can be displayed in addition to the detected URL. The handler definition simply uses a WebClient and Regex to retrieve and return the page title (see the source code for the full handler implementation).
public void ProcessRequest(HttpContext context)

������� {

����������� context.Response.ContentType = "text/plain";

����������� var url = context.Request.QueryString["url"];

����������� if (string.IsNullOrEmpty(url))

�� ���������{

��������������� context.Response.End();

��������������� return;

����������� }

����������� var client = new WebClient();

����������� string source = client.DownloadString(url);

����������� var title = Regex.Match(source, @"<title>[\s*\r*\n*\t*]*(.+?)[\s*\r*\n*\t*]*</title>", RegexOptions.IgnoreCase | RegexOptions.Multiline);

����������� if (string.IsNullOrEmpty(title.Groups[1].Value))

����������� {

��������������� context.Response.End();

��������������� return;

����������� }

����������� context.Response.Write(title.Groups[1].Value);

����������� context.Response.Flush();

����������� context.Response.End();

������� }
Using AJAX, we can now call each URL that is detected within our app with the following code:
function bindWebsites(entities) {

� ������if (entities.urls === null || entities.urls === undefined || entities.urls.length === 0) {

����������� $(".websites").hide();

����������� return;

������� }

������� $.each(entities.urls, function (i, v) {

����������� if (v.indexOf("http") === -1)

�� �������������v = "http://" + v;

����������� $.ajax({

��������������� url: "/GetPageTitle.ashx?url=" + v,

��������������� success: function (response) {

������������������� if (response === "") response = v;

������������������� vm.websites.push({ url: v, text: response });

��������������� },

��������������� error: function (response) {

������������������� vm.websites.push({ url: v, text: v });

��������������� }

����������� });

����������� //vm.websites.push(v);

������� });

��� }
allowing us to display more relevant information to the user.
Creating Meetings
Although we could simply display meetings in a tab just like all the other detected content item types, the Office API offers a bit more functionality we can consume to enhance the sample. By calling the method Office.context.mailbox.displayNewAppointmentForm() we can initiate the familiar Appointment dialog allowing the user to save the detected meeting to their schedule.
This method accepts a specific set of parameters which are used to pre-populate the appointment to simplify creation, again based on the detected content. Fortunately we can easily map these (if present in the detected item) and pass them to the click event of the button, as shown in this code sample.
function bindMeetings(entities) {

������� if (entities.meetingSuggestions === null || entities.meetingSuggestions === undefined || entities.meetingSuggestions.length === 0) {

����������� $(".meetings").hide();

����������� return;

������� }

������� $.each(entities.meetingSuggestions, function (i, v) {

������� ����var meeting = { text: v.meetingString };

����������� meeting.create = function (e) {

��������������� var formParameters =

������������������� {

����������������������� "requiredAttendees": [],

����������������������� "optionalAttendees": [],

������� ����������������"start": {},

����������������������� "end": {},

����������������������� "location": "",

����������������������� "resources": [],

����������������������� "subject": "",

����������������������� "body": ""

������������������� };

������������ ���if (v.attendees.length) {

������������������� $.each(v.attendees, function (index, value) {

����������������������� formParameters.requiredAttendees.push(value.emailAddress);

������������������� });

��������������� }

��������������� if (v.location) formParameters.location = v.location;

��������������� if (v.start) formParameters.start = v.start;

��������������� if (v.end) formParameters.end = v.end;

��������������� if (v.subject) formParameters.subject = v.subject;

��������������� if (v.meetingString) formParameters.body = v.meetingString;

��������������� Office.context.mailbox.displayNewAppointmentForm(formParameters);

����������� }

����������� vm.meetings.push(meeting);

������� });

��� }
Now when an appointment is detected, the app can respond accordingly to allow creation of an appointment.
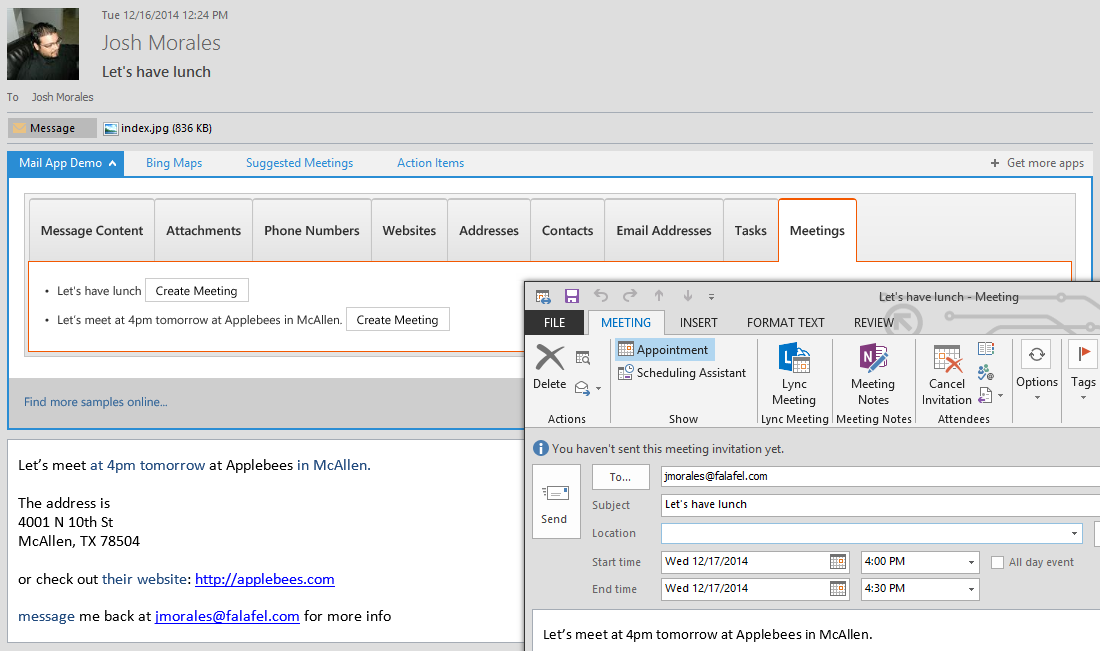
Although such functionality is exposed already by Outlook (evidenced by the Suggested Meetings tab shown alongside our demo app), you could still leverage this within your app to suggest specific meetings based on the context besides only via the recognized sequence of text detected by Outlook.
Creating Tasks (Exchange Web Services)
Although the appointment form is handy, it is unfortunately (as of the time of this post) the only available method of its type for creating an Outlook item from the Office API.
However, this is not to say that it is not possible to create or interact with items in a user�s mailbox. In order to do so however, we must make use of the Exchange Web Services (EWS) via the generic call to Office.context.mailbox.makeEwsRequestAsync.
This method accepts two parameters. The first is an XML string which represents the SOAP request to be passed to the EWS. The second is a callback that fires on completion of the request, and contains both the result status and the resulting XML response.
Working with EWS via SOAP is mostly outside the scope of this post, however, for the purposes of the demo the sample project does implement the code to create a task in the user�s mailbox. First it creates the XML request via a helper method, populating it with the detected properties of the suggested task, then uses that as a parameter for the call to the EWS endpoint.
For our sample app, we are leveraging the CreateItem operation for tasks. Here is the sample code for creating a task, which is then wired into the click event of the create button on the UI.
function bindTasks(entities) {

������� if (entities.taskSuggestions === null || entities.taskSuggestions === undefined || entities.taskSuggestions.length === 0) {

����������� $(".tasks").hide();

����������� return;

������� }

������� $.each(entities.taskSuggestions, function (i, v) {

����������� var task = { name: v.taskString };

����������� task.create = function (e) {

�� �������������var request = createTaskRequest(task.name, new Date());

��������������� Office.context.mailbox.makeEwsRequestAsync(request, function (result) {

������������������� if (result.status !== "succeeded") {

����������������������� app.showNotification("Error", "Unable to add task. Please check permissions");

������������������� } else {

������������������� }

��������������� });

����������� }

����������� vm.tasks.push(task);

������� });

��� }

��� function createTaskRequest(subject, dueDate) {

����� ��var month = dueDate.getMonth() + 1;

������� var year = dueDate.getFullYear();

������� var day = dueDate.getDate();

������� var hour = dueDate.getHours();

������� var minutes = dueDate.getMinutes();

������� var seconds = dueDate.getSeconds();

������� var datestring = year + '-' + month + '-' + day + 'T' + hour + ':' + minutes + ":" + seconds;

������� return '<?xml version="1.0" encoding="utf-8"?> \

��������������� <soap:Envelope xmlns:xsi="http://www.w3.org/2001/XMLSchema-instance" \

������������������� ����xmlns:xsd="http://www.w3.org/2001/XMLSchema" \

����������������������� xmlns:soap="http://schemas.xmlsoap.org/soap/envelope/" \

����������������������� xmlns:t="http://schemas.microsoft.com/exchange/services/2006/types"> \

��������������� <soap:Body> \

����������������� <CreateItem xmlns="http://schemas.microsoft.com/exchange/services/2006/messages" \

����������������������� xmlns:t="http://schemas.microsoft.com/exchange/services/2006/types"� \

����������������������� MessageDisposition="SaveOnly"> \

� ��������������<Items> \

��������������� <t:Task> \

����������������� <t:Subject>' + subject + '</t:Subject> \

����������������� <t:DueDate>' + datestring + '</t:DueDate> \

����������������� <t:Status>NotStarted</t:Status> \

��������������� </t:Task> \

��� ������������</Items> \

��������������� </CreateItem> \

��������������� </soap:Body> \

��������������� </soap:Envelope>';

��� }
For more details on working with EWS, including sample SOAP requests and responses to use in your app, be sure to review the documentation: Call web services from a mail app for Outlook
Permissions
It is important to note that in order to create items in a user�s mailbox, you must declare and request this permission in the manifest. Double click the manifest in the solution explorer and in the General tab of the manifest editor, be sure that you have selected the Permissions option for �Read write mailbox�.
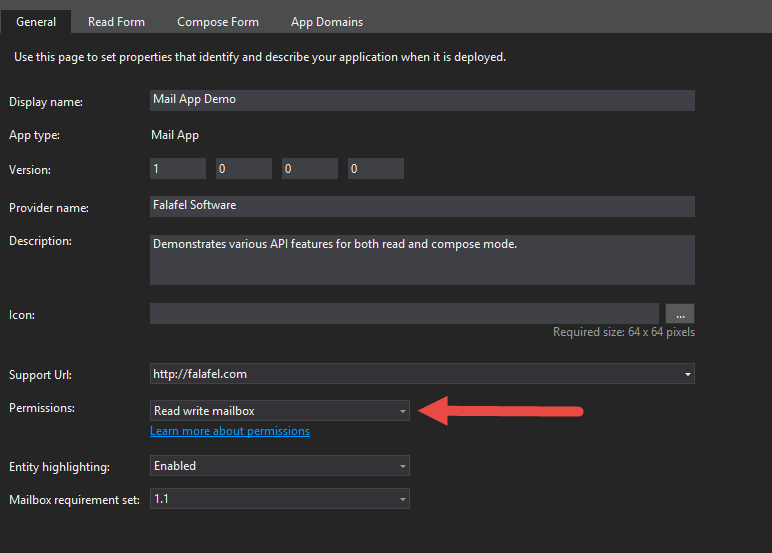
Now, whenever the app detects a task, it can be created programmatically via the EWS, and saved to the user�s task list.
Wrapping Up and Next Steps
The Mail Apps offers a rich API for both detecting and interacting with various content when reading an Outlook item. Most of the API methods we used for our test email message will also function with Appointments, offering consistent behavior across the different Outlook types.
Now that we�ve seen some of the API features of a Read Mode app, we�ll wrap up our review of Mail Apps by looking at the available functions of Mail Apps in Compose Mode in our next post.